Here is the finished Shadow Box before I added my photo:


The Kit included: (1) 12x12 Pc Bo Bunny “Et Cetera” ET CETERA, (1) 12x12 Pc Bo Bunny “Et Cetera” CUT OUTS, (½) 6x12 pc Simple Stories Generations “Together” paper,(1) Black Paper Clip,(1) Clear Gem,(4) Metal Flower embellishments, (1) pc Tulle netting, 1 pc brown beaded trim, 1 pc old dictionary paper.
Additional items needed: Viva Decor BLACK Pearl Pen ( or black stickles,) Ranger Distress Stain "Walnut Stain," or any BROWN Distress Stain, and any BROWN INK Pad or CHALK for edge distressing, Tattered Angels Glimmer GLAZE "Indian Summer," Tattered Angels Glimmer MIST "Pumpkin Spice." 3D Foam/Pop Dots, Fabritac Liquid Adhesive., water & Q-Tips, Bone folder. Water spritzer.
FIRST - Paint Glimmer Glaze on all 4 metal flowers and on clear gem - let dry.
Instructions: SAVE ALL SCRAPS - Cut "ET CETERA" paper at 8”x10” with the Black ETC in the lower right corner ( 8” high x 10” wide) INK the edges. Turn the paper over and tear @ 1-1/2" strip down the right side -*Tear BOTH sides of the length of the paper, and tear the 2 short sides to make an @ 8" pc. INK the edges. CUT the Simple Stories "Together" ½ sheet into a 6”x8” pc for frame.(Set aside for now) Cut out the following on the CUT OUTS - "dream" Tag, Black Bingo card, "imagine the possibilities" *cut around fancy edge. Cut out the "B" "I" and "G" from the RED Bingo card. FOR FLOWER - Tear (2) "circles" from the remaining "Together" (1) @ 3"/largest (1) @ 1 1/2"/smallest. Tear (2) circles from ET CETERA (center layers) (1) @ 2 1/2" & (1) @ 2" - INK all edges of all of the above, including the pc of old dictionary paper. Change the "blue" color on the "dream" Tag to orange, by painting with Pumpkin Spice Glimmer Mist (use a paint brush)When Dry - add the "BIG" RED squares.
TO MAKE the Frame - Center a 4"x6" piece of Chipboard on the 6"x8" pc of "Together" paper. Fold up all 4 sides and crease with bone folder. Tear off corners, and tear @ 1/4" off around all edges. Ink edges with Stain, run Q-Tip with stain along inside crease. Spritz edges with water, and ROLL around a pen or pencil. Let dry. Edges will keep their rolled shape.
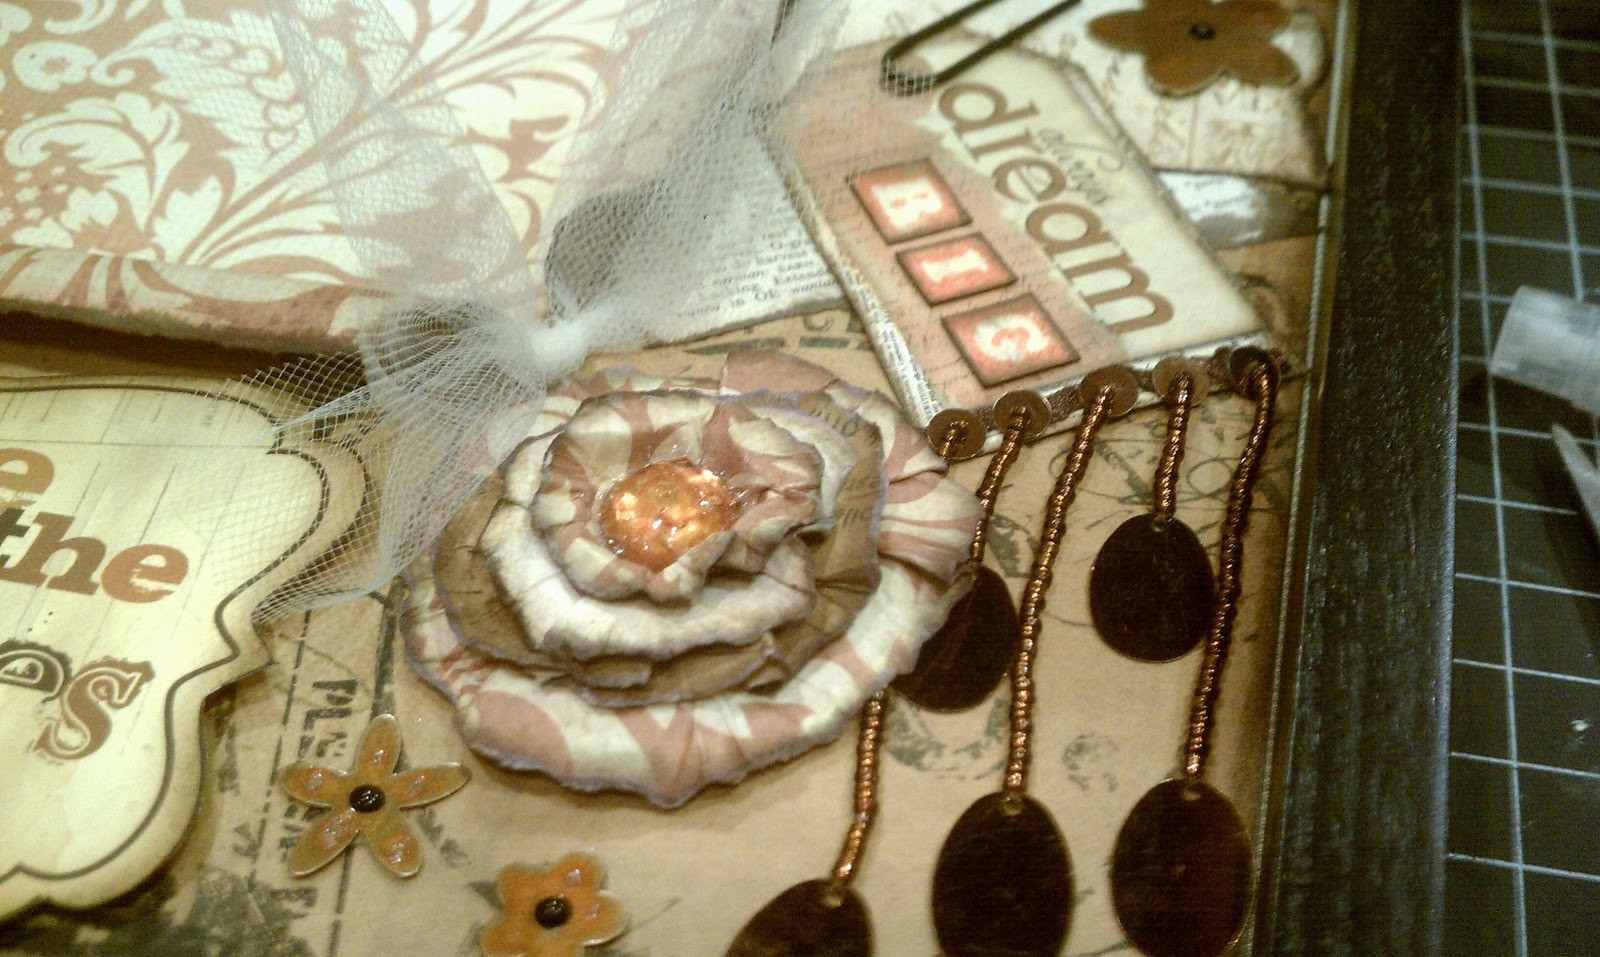
To MAKE the FLOWER - One at a time - Spray both sides of each of the (4) circles with water. (not too wet -start our lightly -just enough to make them pliable and easy to wrinkle/shape) take each circle and fold up from the center -like into a bud. Unfold edges outward, pinching as you work your way around the circle to give it dimension - *Circles are layered as -Large Together, 2 ETC -large one dark side up, smaller one light side up - then smallest Together in the center. Once they are dry - glue them together and add Gem in the center.
ASSEMBLY: GLUE the 8x10 pc inside the box with Fabritac. Glue the Dictionary page on an angle in the top right corner. Add the strip of the ETC paper across the top @ 1" from the edge *leave a place to slip the paper clip under. BINGO card is glued to the bottom left. Add the brown beaded trim to the bottom of the "dream BIG" tag, with RED LINE tape. Position all remaining elements ( frame, flower, dream tag, metal flowers, Imagine tag) in the box before gluing . Once you have it to your liking -glue everything down. Glue metal flowers with Glue dots & Imagine Tag with POP Dots. Add BLACK Pearl centers to the flowers. Tie a knot in the tulle & add near flower as shown. The photo opening is 4"x6" - I trimmed my photo to @ 3" x 5" by tearing the edge and then inking with brown stain. I also printed it in Sepia with a faux frame/mat. I think it looks really good - BUT- you do NOT have to print it in Sepia - it is all your personal choice.
I hope this inspired you to create something "off the page"
Enjoy!
Sherri


